MPC2000 Classic
Finds MPC2000.SYS in the folder, disk or image you choose and updates it in place, with an automatic backup. Restore Original reverses it.
MPC OS mods by vubeatz
Firmware mods for the Akai MPC2000 Classic and MPC2000XL: extended tune range, program transpose, mute groups, parameter copy, folders, per-track programs and sample regions. The installer patches your own original OS file on your computer; nothing is written to the MPC.
Finds MPC2000.SYS in the folder, disk or image you choose and updates it in place, with an automatic backup. Restore Original reverses it.
Updates your copy of MPC2KXL.BIN (524,288 bytes) in place. Restore Original reverses a recognised update.
Both apps work offline on your computer and only prepare OS files; they never write to the MPC. Individual mods cannot be selected separately. You need the original Akai OS file for your machine: see Get your original OS.
All eight mods are installed together. They do not take away any function of the original MPC2000 and MPC2000XL systems. Each keeps the native workflow of its machine; features marked Classic or XL apply to that machine only.
Classic · XL
Program/pad TUNE extended to −360…+360 in 0.1-semitone steps: three octaves down or up per note. On the XL the range also applies in the native TUNE window and in AUTO.
Classic · XL
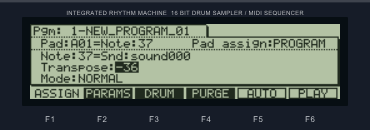
Transpose a whole program by −36…+36 semitones without rewriting the TUNE of its 64 notes. Classic: TRANS window on ASSIGN. XL: Transpose field on ASSIGN. TUNE plus Transpose is limited to ±36 semitones.
Classic · XL
Four independent choke groups, set per note in the mode field next to NORMAL / SIMULT / VEL SW / DCY SW. A new note in a group stops the earlier voice of that group, as with open and closed hi-hats.
Classic · XL
Copy ATTACK, DECAY, DECAY MODE, FREQ, RESON, TUNE or VOICE OVERLAP from one note to a whole pad bank or to all 64 notes of the program.
Classic
FAT12 / FAT16 folders on floppy, HFE and SCSI: browse, create, rename and delete from the panel, load and save inside them, and open them from the file list with F3 OPEN. Saving into a SCSI folder keeps the folder you selected.
Classic
Hold AFTER and move the NOTE VARIATION slider to set the START or END point on the main TRIM screen, then fine-tune with DATA. The XL keeps its own native slider support.
Classic
Assign an internal program to each track with a 1P–24P selector on MAIN. Up to four different programs sound at the same time; the 32 voices stay shared.
Classic · XL
Split a sample into 16, 8 or 4 regions and play them from the pads: even split of the TRIM range, manual START / END editing with waveform zoom, region numbers recorded into the sequence, and region maps stored in the ALL file.
The mods are discussed in the video below.
The installers accept the exact supported original files and their own outputs; they do not convert arbitrary files. Keep a copy of your original.
The original OS files come from Akai and are not included with the installers. Get the latest version for your machine.
OS 1.72 · latest
Akai no longer hosts OS 1.72. Use your own OS disks, or the archived copy of Akai’s original download: the ZIP holds MPC2000.SYS, MPC2000.EXE and the upgrade notice.
Archived from akaipro.com by the Internet Archive. The installer takes MPC2000.SYS, or your own boot disk as an HFE image.
OS 1.20 · latest
Download it from Akai Pro and unzip it: the ZIP holds the OS file MPC2KXL.BIN. Take v1.20, not v1.14; the updater accepts only v1.20.
MPC2000 Classic Installer · changes the file in place
macOS: open the ZIP and the MPC2000 Classic Installer app inside it. Windows: run the Setup and start MPC2000 Classic Installer from the Start menu.
Drop the folder or disk that holds your original MPC2000.SYS, or a supported HFE/IMG image, into the window — or use Choose Folder… / Choose Image…. Wait for Ready to update.
Click Apply Update. It updates MPC2000.SYS in place — inside the folder, disk or image you chose — and saves a backup of your original beside it first.
Use that same disk or card in the MPC, or the updated image with a Gotek. Nothing needs to be renamed or copied. Details in Installation & startup.
Removing the update: Restore Original puts your original firmware back in place, using that backup. Use it on a folder, disk or image this installer updated.
MPC2000XL Updater · changes the file in place
Make a copy of your original MPC2KXL.BIN (524,288 bytes) and keep the name MPC2KXL.BIN. The updater changes the file you select.
macOS: open the ZIP and the MPC2000XL Updater app inside it. Windows: run the Setup and start MPC2000XL Updater from the Start menu. Choose the copy; selecting a file only checks it.
Click Apply Update. Unlike the Classic installer, this changes the selected file itself.
We recommend starting with the OS on a card instead of replacing the OS in the MPC: put the updated file, named exactly MPC2KXL.BIN, in the root of your card or floppy disk and switch the MPC on while holding REC + OVER DUB. It starts the OS straight from the card. Steps in Installation & startup.
Removing the update: Restore Original reverses a recognised update made by this updater.
Step-by-step operation of every mod. The steps assume the modded OS is already running on the machine. F1–F6 are the six keys under the LCD; their function depends on the current screen.
Classic · XL
From your original OS file to the modded system running on the machine.
File names. The SYS for the MPC2000 Classic must be named MPC2000.SYS and the BIN for the MPC2000XL must be named MPC2KXL.BIN; the Classic installer finds the SYS by that name in the folder, disk or image you point it at. Only an HFE or IMG image can have its own unique name.
File formats. Currently supported formats: HFE for Gotek, IMG, and regular SYS file for floppy or card - if You're setup needs another image like .cfg or image for ZULU/SCSISD cards - You have to do them themselves. Create with updater regular MPC2000.SYS file and create image suited for Your device. We cannot simply support all formats, because there is too many of them.
MPC2000.SYS.The updated HFE contains the updated SYS and the unchanged original EXE. HFE is a track image for a compatible floppy emulator, not a raw sector image for writing to a physical floppy.
MPC2000.SYS and MPC2000.EXE at its root.MPC2000.SYS in place and saves a backup beside it; MPC2000.EXE is untouched. The app does not supply the EXE or check the other files on your disk.Renaming an extension does not convert a file: IMA, BIN and EXE are not supported inputs.
MPC2000.SYS at its root.MPC2000.SYS at the root of the image, updates it in place and saves a backup IMG beside it first. Every other file, the boot sector and the image size stay the same.The installer edits the IMG file itself; it does not write to a card or drive directly, and it does not create a card image for you — see File formats above.
MPC2KXL.BIN (524,288 bytes) and keep the untouched original somewhere else. The copy keeps the name MPC2KXL.BIN.MPC2KXL.BIN to the root of your card or floppy disk. It must be named exactly MPC2KXL.BIN.We recommend starting with this. The OS stored in the MPC (flash ROM) is not replaced. To go back to the original OS, switch the MPC on normally, without the keys.
Notice. Not every card reader or card is supporting this feature, the floppy is best way to do it.
MPC2KXL.BIN to the root of a floppy disk or SCSI drive. It must be named exactly MPC2KXL.BIN.Device: to the medium that holds the file and select MPC2KXL.BIN in the File field.This writes OS to Flash memory, press F6 DO IT again.To go back to the original OS, load your original MPC2KXL.BIN the same way. Only load files made for the MPC2000XL: a BIN made for another machine can damage the OS in flash memory.
MPC2000.SYS back in place using the backup the update made; for an IMG, only the SYS content is restored, not necessarily every free byte of the earlier image.Unknown or damaged files are rejected. If a Classic update is interrupted, use the backup copy the installer saved beside your original instead of restarting blind.
Classic · XL
How key combinations are written in this documentation.
| SHIFT + 6 PROGRAM | Hold SHIFT, press 6 (labelled PROGRAM), release SHIFT. The same pattern applies to SHIFT + 5 TRIM and SHIFT + 3 LOAD. |
| F1–F6 | The six keys under the LCD. The same key can mean ALL, FOLDER, PLAY or PROGRAM depending on the screen. |
| DATA | The value wheel. It edits the field under the cursor. |
| OPEN WINDOW | Opens the native window for the selected field. |
| MAIN | The physical MAIN SCREEN key. |
| AFTER + slider | Hold AFTER while moving the NOTE VARIATION slider. Switching AFTER mode on is not the same as holding the key. |
Field names, not cursor counts. The steps name the field to select instead of counting cursor presses, because the starting position depends on earlier work and the remembered state of the OS.
Pad, note, sample and program are different things. A pad points at a program note; a note has parameters and an assigned sample. Two pads pointing at the same note share its parameters. In REGIONS, different pads can play different slices of one source note.
Classic · XL
Program/pad TUNE extended to −360…+360 in units of 0.1 semitone: +10 is one semitone, +120 an octave, +360 three octaves.
Pgm field.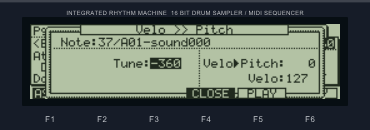
| TUNE | Pitch change |
|---|---|
| −360 | −36 semitones / −3 octaves |
| −120 | −12 semitones / −1 octave |
| −10 | −1 semitone |
| 0 | No change |
| +10 | +1 semitone |
| +120 | +1 octave |
| +360 | +3 octaves |
TUNE is a program note parameter. It is not a whole-program transpose, and it is separate from the sample-level tuning in TRIM / the Sound window, which has a different format and range.
Typing digits (Classic): the native signed-number editor can keep the previous sign. To force a positive value from zero, first turn DATA one step to the right; for a negative value, one step to the left. Then type the digits and press ENTER. Turning DATA alone is the simplest unambiguous method.
The mod changes the value range and the clamp, not how AUTO spreads notes. F5 stays AUTO on the XL; ALL on the main PARAMS page is F2.
Classic · XL
Transpose a whole program by −36…+36 semitones. It is applied while voices start and does not rewrite the TUNE values of the 64 notes.
Pgm.Transpose: field.
Do not look for F5 TRANS on the XL. There the transpose is a field on ASSIGN. On both machines the final sum of TUNE and Transpose is limited to ±36 semitones: TUNE +360 plus Transpose +12 still ends at +36, not at six octaves.
| Note TUNE | Program Transpose | Result |
|---|---|---|
| 0 | +12 | +12 semitones |
| −120 | +12 | 0 semitones |
| +120 | +12 | +24 semitones |
| +360 | +12 | +36 semitones after the limit |
| −360 | −12 | −36 semitones after the limit |
Classic · XL
Four independent choke groups. A new note in a group stops the earlier voice of another note in the same group.
NORMAL, SIMULT, VEL SW or DCY SW.MUTE is not VOICE OVERLAP. POLY / MONO / NOTE OFF is set on PARAMS and controls voice handling; the MUTE group is set on ASSIGN. A group belongs to the program note, not to the physical pad: two pads pointing at the same note share one state. MUTE occupies the same field as NORMAL / SIMULT / VEL SW / DCY SW, so a note cannot be MUTE 1 and SIMULT at the same time.
Repeating the same note on the same pad is governed by Voice Overlap, not by the group. The four groups are independent: MUTE 1 does not mute MUTE 2.
Classic · XL
Copy one parameter from the current note to a pad bank or to all 64 notes of the program.
ALL FOR:.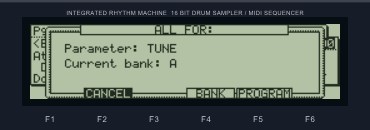
| Parameter | Range |
|---|---|
| ATTACK | 0–100 |
| DECAY | 0–100 |
| DECAY MODE | Two native modes |
| FREQ | 0–100 |
| RESON | 0–15 |
| TUNE | −360…+360 |
| VOICE OVERLAP | POLY / MONO / NOTE OFF |
Only the chosen parameter is copied. FREQ does not copy RESON, TUNE does not copy Transpose, VOICE OVERLAP does not copy MUTE. ALL does not appear on the Pgm and Note selectors.
BANK uses the real pad map (including MASTER), not “the first 16 records”. OFF and invalid notes are skipped, and a note shared by pads in two banks stays shared after the copy. The target, program and value are captured when the confirmation opens; changing PAD BANK with the window open does not redirect the copy. CANCEL does not undo a value you edited by hand before opening ALL.
Classic
FAT12 / FAT16 folder navigation, creation, renaming and deletion from the panel. The XL keeps its own native folder handling.
<DIR>.<DIR> and F6 goes deeper... <DIR> and F6 DO IT goes one level up.The LCD does not show a full path. A .. entry means you are inside a subfolder. Changing the device or partition returns to the ROOT of the new context. Switching from LOAD to SAVE on the same medium and partition keeps the folder.
.. goes up and the list stays open; a file is selected, the list closes and the native LOAD / DO IT procedure starts.SND, WAV, PGM, APS, ALL and SEQ go to their normal loaders and questions. OPEN does not skip the confirmation before data is replaced.
DELETE EMPTY FOLDER?)._ and -.<DIR> and open it.| Screen | F2 | F3 | F4 | F5 |
|---|---|---|---|---|
| FOLDER MANAGEMENT | BACK | NEW | RENAME | DELETE |
| NEW / RENAME FOLDER | CANCEL | — | — | DO IT |
| DELETE EMPTY FOLDER? | CANCEL | — | — | DO IT |
| Result / error | BACK | — | — | — |
Only empty folders can be deleted, and the .. entry can be neither renamed nor removed. Supported media: FAT12 on floppy / HFE and FAT16 on SCSI. There is no FAT32, exFAT or VFAT long-name support. Limits: 16 nesting levels, 256 clusters and 4094 sectors per directory. Folder unavailable can mean a limit, a read error or an invalid FAT chain.
The Replace question refers to the file in the current folder: a file with the same name that exists only in ROOT does not block the save. Changing partition A/B returns to ROOT, so select the folder again. Names such as SOUND030 and SOUND030C do not collide on their first eight characters. Saving has no power-loss transaction guarantee; use a new name when you want to keep the previous file.
Classic
Set START and END on the main TRIM screen with the NOTE VARIATION slider.
Pressing AFTER alone does not move the point. Changing the field while moving disarms the shortcut: release AFTER and press it again for the new field. VARI lets a point move through the whole sample; FIX moves the window and keeps its length (set it with OPEN WINDOW on the point → Smpl lngth → FIX, then close the window). The shortcut works on the main TRIM screen, not in LOOP or the fine windows.
Classic
A 1P–24P selector on MAIN assigns an internal program to each track. Up to four different programs sound at once.
Drum:.1P means internal program 1; 1A–16B are MIDI output channels, and the Pgm field remains the external MIDI Program Change, so do not use it instead of 1P / 2P. OFF keeps the earlier reference to the current program; use explicit 1P / 2P for a repeatable arrangement. ALL does not supply a missing program or its audio.
Slots 1P–24P can all be selected, but new notes are limited to four different programs at once. At PLAY, the first four different programs on used DRUM tracks, scanned from track 1 to 64, take priority. Two tracks with the same program occupy one place. Muting a track does not change the order.
| Track | Assignment | Result |
|---|---|---|
| 1 | 1P | Plays |
| 2 | 2P | Plays |
| 3 | 3P | Plays |
| 4 | 4P | Plays |
| 5 | 5P | New notes are skipped |
| 6 | 2P | Plays; reuses a program already counted |
While four other programs are still sounding, a new note of a fifth program is skipped. It is not delayed or played later. Note Off always passes so earlier voices can end. Polyphony stays a shared pool of 32 voices, not 32 per program. 5P can play if it fits within the first four different assignments: the limit is not “slots 1–4 only”.
Classic · XL
Split a source sample into 16, 8 or 4 regions and play them from the pads.
REGIONS divides the TRIM range of a source sample into 16, 8 or 4 slices playable from the pads. It does not create 16 new SND files or new entries on the Sound list: the system keeps the source and a map of its boundaries, and prepares extra PCM copies for playback. A recording stores the source note and region number, so changing the source’s map also changes previously recorded REG events. EVEN means an equal split of the length. There is no transient detection, time-stretching or loop tempo matching.
Drum:; XL: the native DRUM part).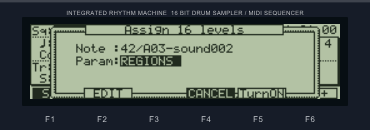
With 16 regions pads 1–16 play; with 8, pads 1–8; with 4, pads 1–4 (pad 1 is bottom left, pad 16 top right). Inactive pads do not play a region. Turn ON, APPLY and the automatic rebuild after a count change silence active voices before the buffers are rebuilt. F2 EDIT only appears for REGIONS; other Param values bring back the native frame.
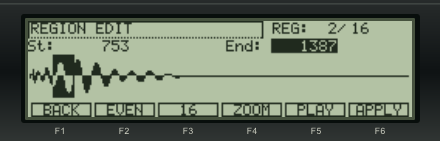
| Key | Action | Commits the map? |
|---|---|---|
| F1 BACK | Exit, discard manual changes since the last APPLY or DONE, restore the earlier 16 LEVELS state | No |
| F2 EVEN | Even working split of the current TRIM range | No, needs APPLY |
| F3 16/8/4 | Next region count, EVEN and automatic APPLY; stays in the editor | Yes, at once |
| F4 ZOOM | Next waveform view | No |
| F5 APPLY | Commit manual boundaries so the pads play them; stays in the editor | Yes |
| F6 DONE | Accept the changes and return to MAIN with 16 LEVELS on | Yes |
| MAIN | Back to MAIN with 16 LEVELS on for the chosen source; discards the manual draft | No |
BACK cannot undo a split committed by F3. If you have sixteen hand-placed slices and press F3, the new even split of 8 is real; save the earlier map in an ALL file first if you want to keep it. Going from 4 back to 16 also creates a new even split. It does not restore old manual boundaries, but it can bring back recorded REG 5–16 events that were silent at four regions.
Pads play the last applied map. If a moved point makes no audible difference yet, press F5 APPLY to update what the pads play without leaving the editor. Press F6 DONE only once you are finished; it accepts the changes too, and exits to MAIN.
St), cursor right selects END.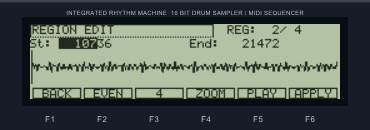
Values are PCM sample positions, not bytes, milliseconds or sequencer ticks: 44,100 samples is one second at 44.1 kHz. For N regions there are N+1 points, so the END of region 1 is the START of region 2 and moving one moves the other. The editor never allows an empty region or crossed boundaries. The dark highlight covers the field up to and including the selected digit, as in TRIM. F2 EVEN takes the current TRIM range again and can replace a manually narrowed outer range.
REGION EDIT opens on the whole-sample view. F4 ZOOM cycles four views: the current region, about ±128 samples around the active boundary, about ±1024 samples, and the whole sample with the selected region inverted. The waveform is computed in the background, so a long source can need a moment to refresh.
Regions inherit the parameters of the source note. Set VOICE OVERLAP on PARAMS for the source note (with 16 LEVELS off): POLY lets starts overlap, MONO limits overlap of the earlier voice, and with NOTE OFF releasing the pad gates the voice and new recordings store the held length. To make regions of one sample choke each other like a hi-hat pair, set MUTE 1–4 on ASSIGN for the source note and enable REGIONS again.
REG: in its row.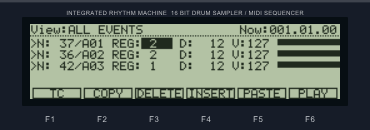
STEP changes the region number of the event; it does not create private START / END points for that note. If the map has four regions, a REG 8 event stays stored but silent. It is not converted or deleted.
| Element | Where it is stored |
|---|---|
| Source audio | SND / WAV through the native save flow |
| Note assignments, MUTE, TUNE, Transpose | PGM or an APS set |
| Classic 1P / 2P track assignments | ALL |
| Sequences and songs | ALL |
| Manual START / END maps and region counts | ALL file extension |
| REG numbers on notes | Sequence events (MIDI type 1 round trip is supported) |
A single PGM, APS, SND or MID file does not store the region maps. A MID carries events and their REG numbers, but the boundary tables live in the ALL extension. After loading, maps are bound to their sources by name, length and mono / stereo, not by a content hash, so different audio with the same name, length and channel layout can be matched to an old map. Loading an ALL can replace sequences and maps: save your current work first.
Limits. Up to 16 sources can have maps at once, each with its own 4 / 8 / 16 split. Playback buffers use extra sample memory even though the sample list does not grow, and stereo needs both channels. On an allocation error the earlier committed map stays active. On the XL, deleting or replacing samples does not free single blocks of the REGIONS pool; loading an ALL resets it. Regions share the native polyphony.
Classic · XL
Every mod edits the program in RAM. Nothing is on disk until you save it.
The word ALL in PARAMS → ALL BANK / PROGRAM means parameter copying and has nothing to do with the ALL project file. Only SAVE creates a persistent file. Transpose −36 is stored as byte FF, and the extended MUTE modes and REG events need matching firmware: the shared PGM / ALL name is no guarantee that stock firmware or other mods reproduce the extensions.
Classic · XL
The short form of everything above.
| I want to… | Classic | XL |
|---|---|---|
| Tune one note | SHIFT+6→ F2 PARAMS→ TUNE→ DATA | Same |
| Transpose a program | SHIFT+6→ F1 ASSIGN→ F5 TRANS→ DATA→ F4 CLOSE | SHIFT+6→ F1 ASSIGN→ Transpose field→ DATA |
| Set a mute group | SHIFT+6→ F1 ASSIGN→ mode field→ MUTE 1–4 | Same |
| Copy a parameter to a bank | PARAMS→ parameter→ F5 ALL→ F4 BANK | PARAMS→ parameter→ F2 ALL→ F4 BANK |
| Copy a parameter to the program | PARAMS→ parameter→ F5 ALL→ F5 PROGRAM | PARAMS→ parameter→ F2 ALL→ F5 PROGRAM |
| Assign a program to a track | MAIN→ field after Drum:→ 1P / 2P… | Native DRUM part selection |
| Create a folder | LOAD→ F5 FOLDER→ F3 NEW→ name→ F5 DO IT | Native XL folders |
| Open a folder or file from the list | LOAD→ File→ OPEN WINDOW→ row→ F3 OPEN | Not a ported function |
| Open the region editor | STOP→ 16 LEVELS→ source→ REGIONS→ F2 EDIT | Same |
| Commit manual boundaries | REGION EDIT→ F5 APPLY | Same |
| Leave the region editor | REGION EDIT→ F6 DONE | Same |
| Change the region count | REGION EDIT→ F3 (automatic EVEN + APPLY) | Same |
| Pick a digit in REGION EDIT | Outer DIGIT ring | SHIFT + cursor left / right |
| Change the REG of a recorded note | MAIN→ F1 STEP→ REG field→ DATA | Same |
| Keep regions after power-off | DONE→ SAVE ALL + programs and samples | Same |
Classic · XL
The most common surprises and what to check first.
| Symptom | What to check |
|---|---|
| The Classic installer rejects my folder or file | The folder must hold exactly one MPC2000.SYS; an IMG must be an unpartitioned FAT12/FAT16 image with that file at its root. Only exact supported originals and files made by this installer are accepted; restore an earlier release with its own installer first. |
| The XL updater rejects my BIN | It accepts only the exact original OS 1.20 from Akai, not v1.14, and its own outputs. |
| F5 opens AUTO instead of ALL (XL) | Correct. On the XL’s main PARAMS page ALL is on F2. |
| No F5 TRANS (XL) | The XL has a Transpose field on ASSIGN instead of a window. |
| ALL does not appear | You must be on PARAMS on one of the seven supported fields, not on Pgm or Note. |
| BANK also changed a pad in another bank | Both pads point at the same note record. |
| TUNE +360 with Transpose +36 is not six octaves | The final sum is limited to ±36 semitones. |
| A fifth program is silent (Classic) | The four-program limit: check track order and voices still ringing out. |
| Selecting Pgm does not choose an internal program (Classic) | Use the field after Drum: with 1P / 2P, not MIDI Program Change. |
| Folder DELETE refuses (Classic) | Only empty folders are deleted, never ... |
| A folder “disappeared” after switching partitions | A new partition starts at ROOT. Select the folder again. |
| The slider does not move a TRIM point | Select St or End and hold AFTER; after changing fields, release and press AFTER again. |
| The pads ignore the points on the LCD (REGIONS) | The LCD may show a draft; the pads play the last applied map. Press F5 APPLY. |
| BACK did not restore my slices (REGIONS) | F3 commits an even split at once; BACK cannot undo it. |
| Pads 9–16 are silent (REGIONS) | Intentional with a count of 8. With 4, pads 5–16 are silent. |
| Editing one point moves the neighbour (REGIONS) | Shared boundary: the END of one region is the START of the next. |
| Part of the recording vanished after 16 → 4 (REGIONS) | REG 5–16 events stay stored but are silent at four regions. |
| A long note stops at APPLY (REGIONS) | Active voices are silenced before the buffers are rebuilt. |
| After LOAD MID the slices are wrong (REGIONS) | A MID has no boundary tables. Load the matching ALL and samples. |
| Old settings came back after a restart | RAM changes need a save: PGM / APS, SND or ALL, depending on the feature. |
The source code of all eight mods is public on GitHub. Anyone can look at how the mods are built and what each one changes in the MPC2000 and MPC2000XL systems.
 vubeatz
If you find these mods useful and would like to support my work, you can also take a look at my VST plugins and drum kits.